
Prepare an EDGAR Filing in Plain Text
Jump to sections:
- Step 1—prepare document
- Step 2—save as plain text
- Step 3—validate document
- Step 4—correct invalid ASCII characters
- Step 5—resolve line break errors
The EDGAR system only accepts documents that are submitted in HyperText Markup Language (HTML) or American Standard Code for Information Interchange (ASCII), also known as plain text. Follow these steps to prepare your document in ASCII/plain text format.
Step 1—Prepare Document
When preparing a document in Microsoft Word to convert to ASCII/plain text, it is important to adhere to the following guidelines.
- Lines may not exceed 80 characters.
- To help your text stay within the designated area, type your information using Courier or Courier New, font size 12. Make the right and left margins at least 1 inch.
Apostrophes and smart quotations are sometimes marked as invalid characters because other fonts can create a slanted apostrophe that ASCII cannot recognize. So it is important to use Courier or Courier New to make sure the apostrophe is not slanted.
Foreign characters such as the yen (¥) and pound sterling (£) characters are invalid as well as the character for copyright (©), registered (®), and trademark (™). The complete list of invalid ASCII characters is listed in the EDGAR Filer Manual, Volume II, Section 5.2.1.2.
Formatting such as bold face, underlining, italics, special characters or symbols, automatic pagination, headers or footers, and print fonts are not part of the standard ASCII character set and therefore are not recognized by EDGAR.
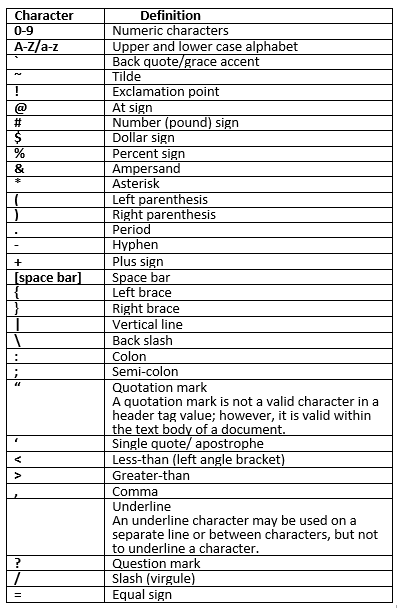
The table below lists valid ASCII characters.
Valid ASCII characters
Step 2—Save as Plain Text
- Save the document as ASCII/plain text in Microsoft Word. Select File > Save As > select Plain Text (*.txt) > Save.
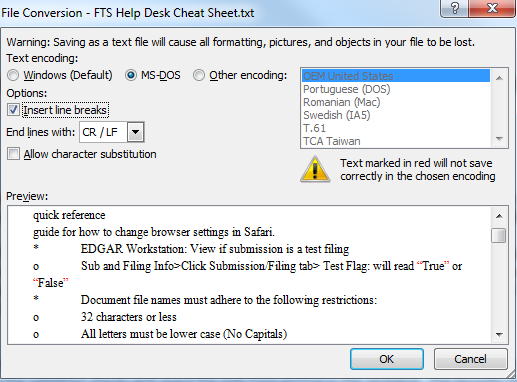
- Next, the File Conversion dialog window appears. Select MS-DOS > Insert line breaks > click OK. See image below.
- After saving your document in the ASCII format, immediately exit Microsoft Word.
Step 3—Validate Document
Once you log in to the EDGAR Filing Website, you can use the EDGARLink Online Form Submission feature to ensure your document does not contain errors (document validation).
- Select the EDGARLink Online Form Submission link from the menu on the left side of the webpage.
- Select the appropriate submission type > Go to Form.
- In order to progress to the documents section of the form, enter the CIK/CCC and other data. Select Add Document > Choose Attachments.
- Browse your computer, locate your .txt document, and click the OK button. Check the box to the left of your uploaded document and select the Doc Validation button.

- If the document passes EDGAR validation, the error box will read as 0 and you may progress to the next step in preparing your filing for submission.
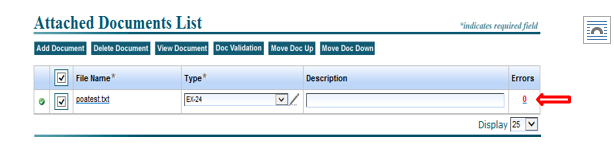
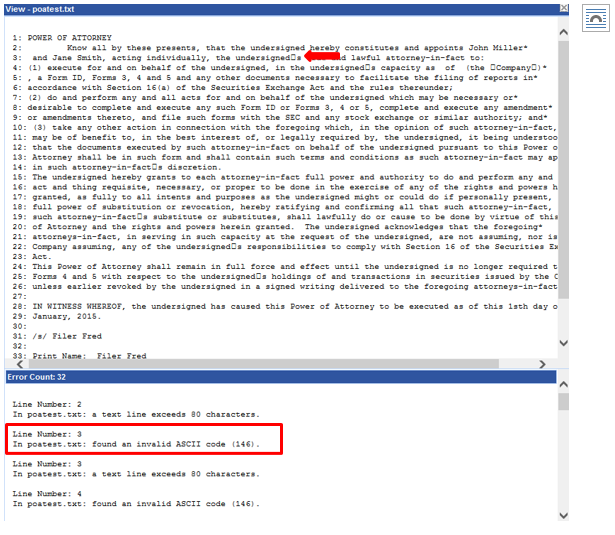
- If the document does not pass EDGAR validation, the number of errors will populate in red.

- Click the number to view the specific errors.
Step 4—Correct Invalid ASCII Characters
Most invalid ASCII characters are a result of the conversion to plain text. EDGAR views smart quotes (“example”), en dash (–), and em dash (—) characters as invalid. Certain word processing software programs will convert apostrophes and quotation marks to smart quotes and replace hyphens with en and em dashes.
It is helpful to open the document in NotePad—a simple text editor included in Microsoft Windows—in order to reference the line numbers and specific invalid characters detected by EDGAR. Open the plain text document in Notepad, delete the invalid characters, and replace with valid characters.
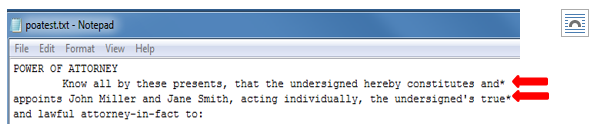
Step 5—Resolve Line Break Errors
As previously stated, each line cannot exceed 80 characters.
- To resolve this error, type an asterisk (*) at the end of each line that exceeds the maximum limit of 80 and continue the remaining text on the next line. Continue this process for each line number that was detected in the document validation viewer.
- Note—the 80-character-per-line limit includes blank spaces.
- Save your changes by selecting File > Save.
- Repeat Step 3 to validate the document and proceed with filing when you have resolved the invalid character and line-break errors.
Last Reviewed or Updated: Oct. 31, 2024